
Disclaimer: performing this procedure may void your warranty. Proceed at your own risk.
Warning: this is a slow and tedious process. If you are not mechanically inclined, think wrenches can be used as hammers or have a short fuse — do not attempt to adjust the alignment yourself. You’ll probably make it worse than it was.
Before you begin to attempt aligning the Platen of your Omni, ensure your Mast is perpendicular to the Swing Arm.
The simplest way of doing this is setting the angle of the Faceting Head to around 70 degrees, so it’s almost horizontal. Put the large dop in the Quill and the flattest lap you own on the Platen. In my case I have an old ceramic lap that I used on my MDR faceting machine, which I know is as flat as I can hope to get.
Adjust the Swing Arm and Faceting Head so the tip of the dop just barely touches the surface of the lap at the 6 o’clock position (closest to the user).
Swing the dop slowly across the surface of the lap and observe closely the path the tip traces. If the tip traces even a slight arc rather than a straight line — that is, it’s either lower at the edges or lower in the middle than the edges — your mast will need alignment.
Test this several times with the Swing Arm in various positions.
For an explanation of what you are looking for, have a look at the Omni Mast Not Aligned page. The arc may be reversed (tip higher at the edges than in the middle) depending on your particular machine.
If you determine your Mast is not straight, check out the Aligning the Mast page.
Once you are sure your Mast is as straight as it can be, proceed with aligning the Platen.
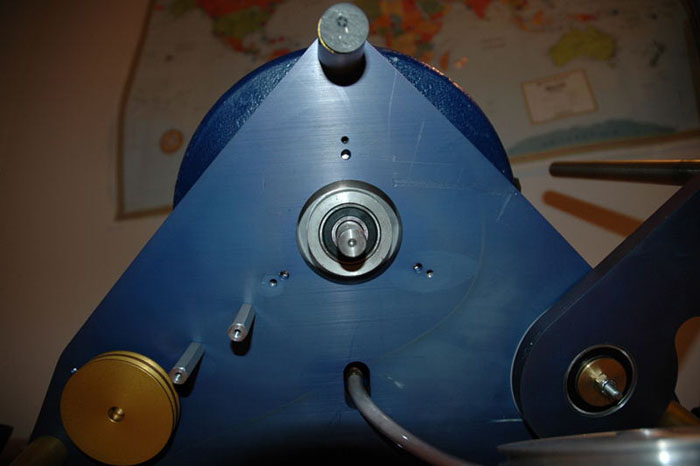
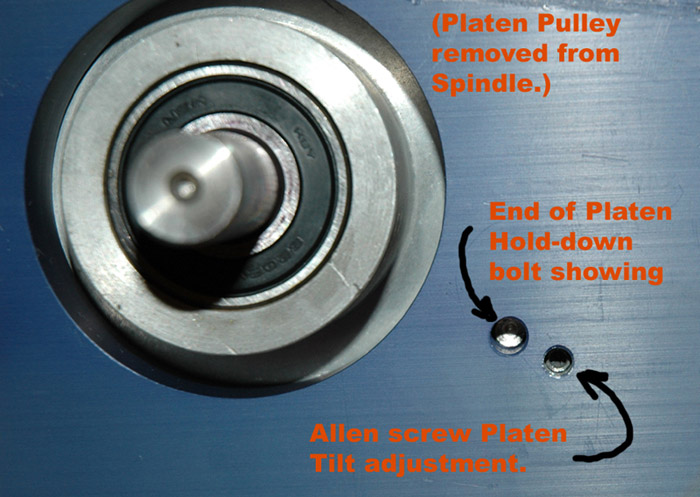
The method for aligning the Platen to the Faceting Head is done by adjusting both the Hold-down Bolts and Allen screws that attach the Spindle Housing to the Omni base plate. Below are some photos showing where these Hold-down Bolts and Allen Screws are.
Here are some instructions I received from the owner of Jersey Instruments:
“Look under the splash bowl. You will see three mounting bolts. These bolts control the alignment of the platen. Using a 7/16 wrench, you can adjust the bolts to align the machine. Do not loosen or tighten the bolts more than 1/2 turn. There are set screws under the base plate which must be adjusted to tension the spindle housing. They are accessed by removing the spindle pulley. For minor adjustments you need not adjust the set screws.”
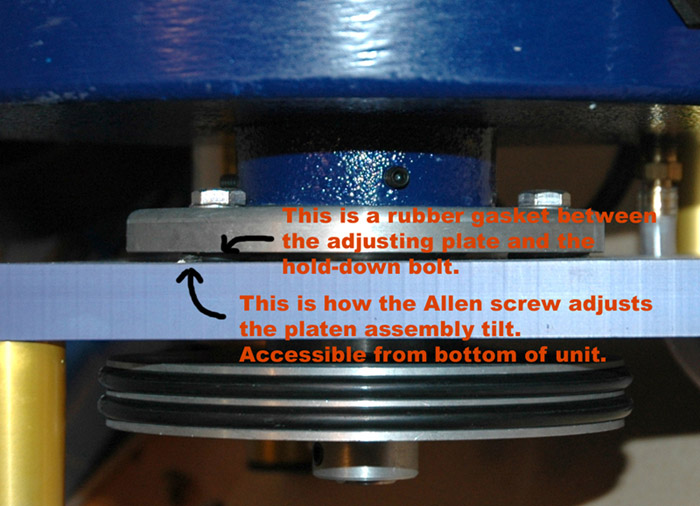
Here is a side-view of those Hold-down Bolts and Allen Screws. Note the rubber o-ring showing in the picture.
My experience is that those hold-down bolts are very tight and you need to be careful in tensioning them more than they already are. In fact, I don’t recommend following the above instructions at all. In my opinion it’s too easy to over-tighten the Hold-down Bolts and damage something.
I ended up loosening the Hold-down Bolts (7/16″ wrench) and removing the Spindle Housing from the Base Plate. I discarded the rubber o-rings as they were torn and I could see no obvious function they performed. After cleaning the whole area of swarf and corrosion and removing and greasing the Hold-down Bolts and Allen Screws, I set the Spindle Housing back on top of the Allen Screws and put the Hold-down Bolts in finger-tight. Make sure you orient the Spindle Housing correctly – with the Splash Pan opening pointed in the right direction.
Note: For my alignment process the Spindle Pulley will not be attached to the Spindle.
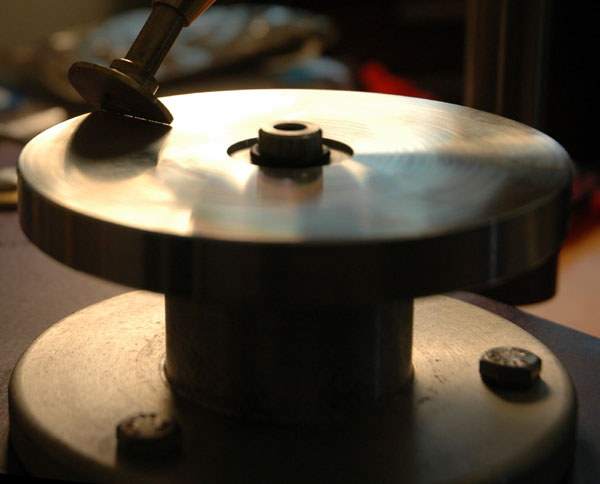
Important: With a dop in the Quill lower it to barely touch the Platen. Rotate your Platen to find out where the high spot is, and mark it with a Jiffy marker or something. You will want to base all your measurements from this same point on the Platen for each of the positions listed.
With a dop in the Quill I then positioned the tip of the dop just touching the mark on the Platen right above the 6 o’clock Hold-down Bolt.
I then moved the Swing Arm and Quill so the tip of the dop was above the 2 o’clock Hold-down Bolt, rotating the Platen so the tip of the dop is on the marked spot.
Using a 3/32″ Allen key I adjusted the 2 o’clock Allen Screw under the base plate to get the Platen to just barely touch the tip of the dop.
I repeated the process at the 10 o’clock Hold-down Bolt, then went back to the 6 o’clock Hold-down Bolt to verify the Platen was still just touching the tip of the dop. Be sure to rotate the Platen so the high mark is under the dop tip each time. I repeated this process a couple of times.
You can see photos of the process I used below. I used the D-dop and my newly-reduced Platen in these photos. I left off the Splash Pan for clarity. The pictures are in order for the 6, 2, and 10 o’clock Hold-down Bolt positions.

Seeing these photos makes me want to wipe the grease and fingerprints from the Platen!
Now go around and carefully tighten the Hold-down Bolts in turn checking the alignment with the dop as described above for each one. Don’t forget to rotate the Platen so the mark is under the dop tip each time.
I tightened each Hold-down Bolt about 1/8 turn at a time, going round and round until they were tight but not feeling forced. As you tighten the Hold-down Bolts you will see a space open up between the tip of the dop and the Platen. Adjust the height of the Faceting Head after each round of tightening so the tip of the dop barely touches the Platen surface.
Now test the alignment by putting your flattest lap on the Platen and putting the D-dop into the Quill. Adjust the angle and height of the Faceting Head so the edge of the D-dop barely touches the lap surface. Use the Cheater to make sure it’s as level as you can get it. And now sweep the dop across the lap with the Swing Arm in various positions. If you’ve adjusted the Mast and the Platen well, you should see the dop sweep across the lap without any arc or change in height. It won’t be perfect but it should be a heck of a lot better than when you started.
Don’t forget to re-attach the Spindle Pulley and put the drive belts and cover on etc.
Not having spent a lot of time cutting recently, I don’t know how long this alignment will hold before having to go through it again. If you try it out, please leave some comments as to your experience.